3 min read
 Eduardo Picado
Introduction
Last year, my colleague Sid wrote the article Spartacus Deployment Automation Using AWS CodePipeline, proposing a solution based on AWS CodePipeline and S3 to address the traditional pitfalls of doing CI/CD in the SAP Commerce Cloud. Those included:
- Single core repository shared between Spartacus and SAP Commerce front-end;
- Unavailability of a CI/CD pipeline;
- No automated build and deployment available — I proposed a solution for the backend in the article SAP Commerce Cloud Build and Deployment Using AWS Step Functions.
In this article, I will show how to build CI/CD for Spartacus using AWS Amplify. Amplify Hosting provides a git-based workflow for hosting web apps with continuous deployment. It automatically builds, deploys and hosts the web app globally on a CDN powered by Amazon CloudFront.
It’s very easy to set up and has many useful features that can be activated with a few clicks. Moreover, the Amplify platform also allows accelerated development of backends that can easily be integrated with AWS services and potentially be used to complement the main SAP Commerce backend.
Solution Overview
As I didn’t have an SAP Commerce instance in the public cloud available for this POC, I used one running on my local machine. I used ngrok to make the local host backend available on the internet while hosting Spartacus in AWS Amplify. This configuration may also be interesting for development, testing and demos.
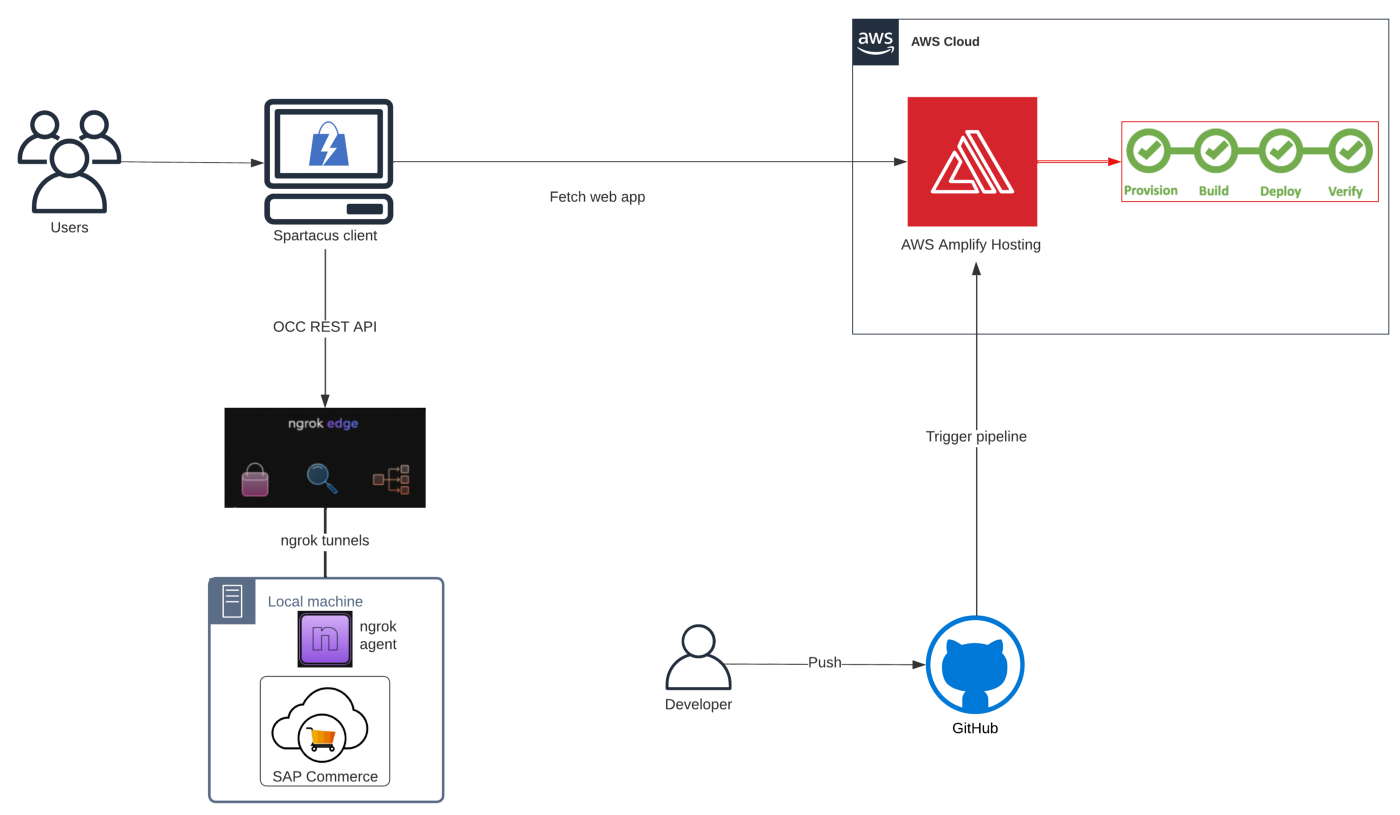
Architecture
Prerequisites
- An AWS account and an AWS user or role with sufficient permissions to create the necessary resources.
- Access to SAP Software Downloads website to download SAP Commerce.
- A repository on GitHub, Bitbucket, GitLab, or AWS CodeCommit repositories.
- A free account on ngrok
Steps
Set Up SAP Commerce Backend
Setup SAP Commerce Cloud for use with Spartacus on your local machine. Follow the instructions from Installing SAP Commerce Cloud for use with Spartacus. I followed the link for 2105 and kept all the stores although the time to initialise was long. In the end, you will have SAP Commerce running on your machine on port 9002.
Set Up Spartacus
Let’s first set up Spartacus on your local machine. Follow Building the Spartacus Storefront From Libraries. I followed instructions for using 4.x libraries. Make sure you use the mentioned versions of Angular CLI, Yarn and Node.js. You end up having built a Spartacus app, and it will be running connected to SAP Commerce.
Set Up Ngrok
Go to ngrok and create an account. Once logged in, follow the instructions from Setup & Installation to download and install the ngrok binary for your platform. On the same page, you will find your personal Authtoken. You will use this to authenticate the ngrok agent that you downloaded.
Run the following commands:
To connect your account:
ngrok config add-authtoken [your auth token]
To start an HTTPS tunnel forwarding to your local port 9002, as required by SAP Commerce:
ngrok http https://localhost:9002
You will get a public HTTPS address for your local server already serving HTTPS:
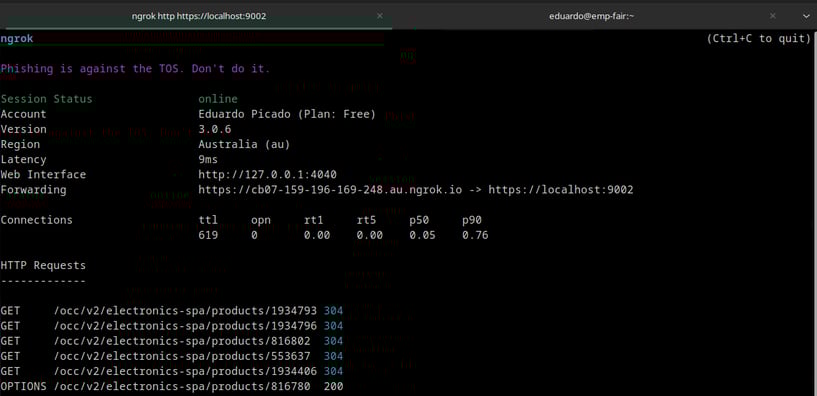
ngrok on terminal
As an example, mine here is https://cb07-159-196-169-248.au.ngrok.io.
You can test it working by appending /backoffice to this address. Open this URL in your browser, and you should see the SAP Commerce Backoffice.
Update the Spartacus App
Going back to the Spartacus app, we must update the file src/app/spartacus/spartacus-configuration.module.ts.
The baseUrl should become the ngrok URL. Commit and push the code to a supported repository like GitHub.
Set Up the Spartacus App in Amplify Hosting
Open the Amplify Console and confirm you are in your target region.
Select New app and then Host web app. You will then need to connect your repository to Amplify and select a branch.
In the next step, you will confirm the build settings — no changes are required here.
We don’t need to configure anything for the backend or environment variables, we will just review all of our settings and choose to Save and deploy.
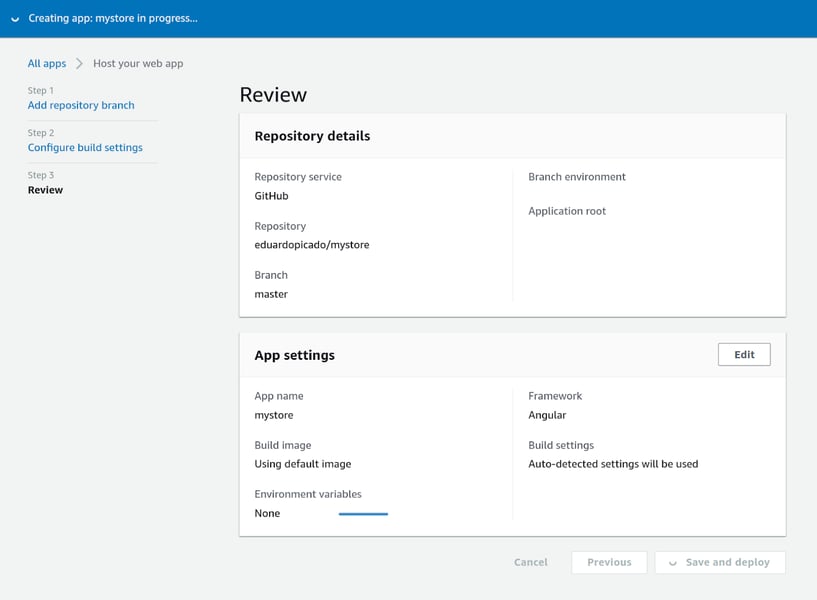
Amplify Console Review
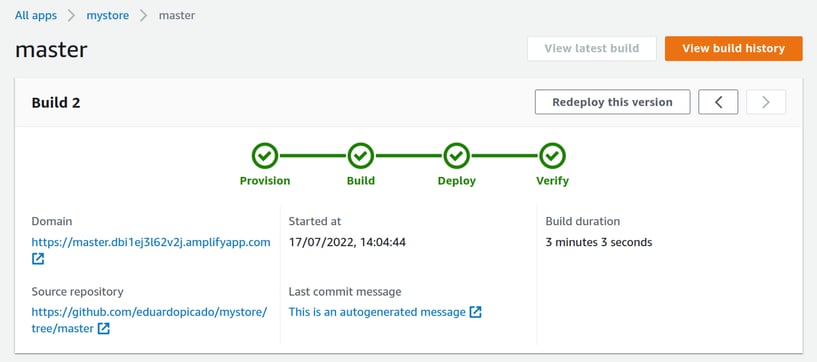
The web app should be available quickly, and a screenshot should be provided.
Check Getting started with existing code for more details.
Testing
The public web app URL will be available under Domain.
Amplify Console
Attach /electronics-spa/ to it, and you should get the electronics store.
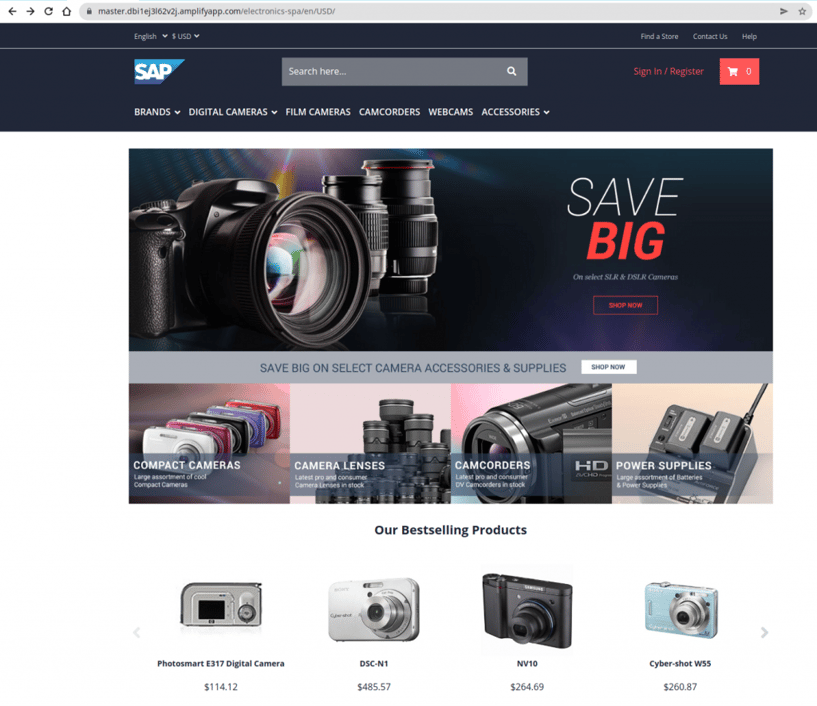
Spartacus Electronics Store
Attach /powertools-spa/ and you should get the powertools store.

Spartacus Powertools Store
You can also monitor the requests on your local backend using the ngrok console on http://127.0.0.1:4040/inspect/http:
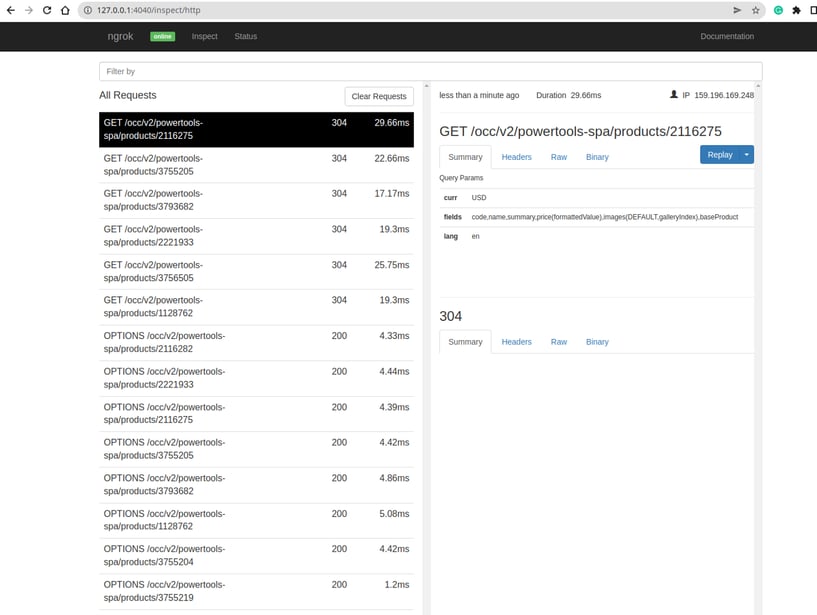
ngrok — inspect
Amplify Features
- Add a custom domain with a free SSL certificate
- Set up a test version of your site by connecting a feature branch
- Amplify Hosting leverages Git branches to create new deployments every time a developer connects a new branch in their repository.
- Password-protect your site
- Enable pull request previews — Previews offer a way to view changes from pull requests before they are merged into the target branch.
- Create a synthetic canary to monitor your app proactively. You can use CloudWatch Synthetics for 24/7 monitoring of broken links, heartbeat checks and testing of different user flows in your app.
Conclusion
In this article, we have explored how we can develop and use a tool that provides a single command interface to build and deploy to an SAP CCv2 instance by leveraging AWS Step Functions.
The workflows of AWS Step Functions are flexible and easy to debug. The solution saves us manual effort and makes getting an SAP CCv2 code to an application server quicker and more straightforward. We hope it will be as helpful for you as it has been for our team.
References
- Spartacus: GitHub – SAP/spartacus: Spartacus is a lean, Angular-based JavaScript storefront for SAP Commerce Cloud that communicates exclusively through the Commerce REST API.
- AWS Amplify: https://aws.amazon.com/amplify/
- Ngrok: https://ngrok.com/
- Using ngrok to get a public HTTPS address for a local server already serving HTTPS (for free): Using ngrok to get a public HTTPS address for a local server already serving HTTPS (for free)
- GitHub repo: GitHub – eduardopicado/mystore